
Preventing Refrigerant Leaks: Standardized Operating Guidelines for HVAC Copper Pipe Flaring (with Tips to Avoid Common Pipe Mistakes)
Preventing Refrigerant Leaks: Standardized Operating Guidelines for HVAC Copper Pipe Flaring (with Tips to Avoid Common Pipe Mistakes)
In the installation of HVAC refrigerant piping, gas, or high-pressure water systems, the reliability of pipe connections is paramount. Open flame welding not only places stringent demands on the operating environment but also poses significant safety hazards when handling gas or fuel lines.
In contrast, high-quality mechanical flaring connections have become the industry's preferred choice. A perfectly flared fitting can easily withstand pressures from 450 to 3000 psi. However, this requires proper operation and a reliable set of flaring tools.
As a professional refrigeration tool manufacturer, our communication with countless frontline HVAC engineers and global distributors has revealed that 80% of refrigerant leaks stem from improper flaring procedures or the use of substandard tools. Today, we will break down the standard flaring process in detail.
Key Understandings Before Flaring:
Material Requirements: Flaring is extremely demanding on the ductility of the pipe material. It is generally only suitable for soft copper pipes (annealed copper pipes) and aluminum pipes. If you only have hard copper pipes, forced flaring will inevitably lead to pipe wall cracking. Professional annealing treatment must be performed before proceeding. Angle Difference: This is where beginners most easily make mistakes. The standard flare angle for HVAC (Heating, Ventilation and Refrigeration) and domestic plumbing applications is 45°; while the standard for industrial, hydraulic, and automotive applications (such as brake lines) is 37.5°. Tools cannot be used interchangeably.
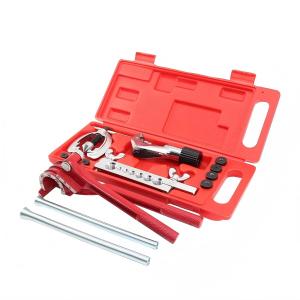
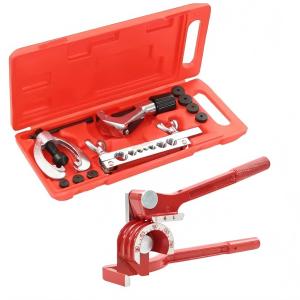
Standard Flaring Operation Steps (Taking a Standard 7-Hole Flaring Kit as an Example)
A standard flaring tool kit typically includes three core components: a clamping plate (mold block) with holes of different pipe diameters, a flaring cone (presser) connected to the yoke, and a pipe cutter.
Phase 1: Pipe Preparation (The Foundation of Success)
Precise Cutting: Use the included professional cutter to cut the soft copper pipe. Never use a hacksaw. Hacksaws produce a large amount of metal shavings and create extremely uneven cuts, directly leading to uneven thickness at the flared edge later.
Thorough Deburring: This is the easiest to skip but most fatal step. Clean burrs inside and outside the pipe opening with a deburring tool or sandpaper. Any remaining debris will be pressed into the pipe wall when the flaring cone is pressed down, forming micro-scratches and ultimately causing slow leakage of high-pressure refrigerant.
Pre-installing the Nut: Before starting any flaring operation, the flaring nut must be inserted into the pipe (threaded end facing the pipe opening). If you find that you forgot to put the nut after flaring, you will have to cut the pipe off and start over.
Phase Two: Tool Positioning and Flaring
4. Secure the Tube: Insert the tube into the corresponding hole in the clamp (e.g., a common 1/4" or 3/8" hole). The top of the tube should be flush with the clamp surface. (Note: Some experienced engineers prefer the tube to protrude slightly by about 1/16 inch; this depends on the specific design of the flaring cone, but flush is usually the safest approach.)
5. Tighten the Clamp: First tighten the wing nut closest to the tube, then tighten the nut at the far end. Ensure the tube is firmly gripped to prevent slippage during flaring.
6. Set Up the Flaring Cone: Insert the yoke into the groove at the bottom of the clamp and adjust its position so that the tip of the flaring cone is directly in front of the center of the tube opening.
7. Rotational Forming: Rotate the flaring cone handle clockwise at a uniform speed. The flaring cone will gradually penetrate deeper into the tube opening, forcing the soft copper wall outward into a perfect 45° flare. Continue rotating until you feel a significant increase in resistance, indicating the cone is fully engaged. Do not overtighten, as this may thin the pipe wall.
Third Stage: Inspection and Installation
8. Demolding Inspection: Retract the flared cone, loosen the clamps, and remove the pipe. A properly made flared end should have a smooth, mirror-like inner wall, no cracks at the edges, and be overall rounded and symmetrical.
9. Physical Fit Test: Align the flared end with the connector body and check for a perfect fit. The flared end should sit flat on the connector cone surface without interfering with the outer threads.Expert Tips for Avoiding Pitfalls: Never use sealing tape: When connecting new flared fittings, never wrap Teflon tape or apply sealant to the threads. Flared fittings seal by purely physical metal-to-metal compression; Teflon tape will actually hinder tightening to the correct depth. You can apply a drop of specialized refrigeration oil to the friction surfaces to aid tightening.
Slippage Issues: If the tube slides down the clamp during flaring, it's usually because the clamp isn't locked properly, or the tool's clamp threads are worn/lacking precision. If this happens, cut off the deformed part and start again.
Precision of Factory-Made Tools: High-quality flaring tools (such as those using high-carbon steel precision-milled clamps and eccentric flaring cones) minimize tube wall friction and prevent slippage. As an OEM factory, we strictly control the tolerances of the clamp hole diameter during production to ensure a secure and seamless clamping experience every time.
Looking for a reliable refrigeration tool supply chain?
High-quality workmanship relies on high-precision tools. If you are an HVAC tool brand owner or wholesaler looking for a reamer manufacturing factory with stable production capacity and support for customization (OEM/ODM), please feel free to contact us for the latest product catalog and ex-factory price.
 Sourcing Auto Brake Line Flaring Kits: A Guide for B2B Distributors
 Source Reliable Flaring Tools: Prevent HVAC Leaks & Boost Margins
 Sourcing Heavy-Duty Rivet Nut Tools: A B2B Buyer's Guide
 Sourcing Heavy-Duty Hand Rivet Nut Tools: A B2B Buyer's Guide